This guide is an extensive manual on setting up the gallery component. After completing this manual you will have a gallery similar to the demoGallery. You can take a sneak preview here
Maarten van de Voorde - Jan 2003
Content
Installation
a. if the Macromedia Extension Manager is not yet installed, download it from here.
b. download the latest version of the component from www.mr10.net/components/gallery
c. close Macromedia Flash MX.
d. doubleclick the galleryComponentX_X.mxp file (X_X being the version number).
e. after installing the .mxp unzip the galleryComponentX_X.zip file to a directory on you hard drive.
The Setup
a. create a directory called 'gallery'. This directory will hold the .fla, .swf, .html and .xml files.
b. in that directory create a directory called 'images'. This directory will hold the .jpg files.
The Images
a. choose dimensions for your images and thumbnails. In this case:
- thumbnails: 84 x 62
- images: 370 x 274
Images will be scaled by the component to fit the available space in the gallery.
b. save the images in a subdirectory 'images', in this case the thumbnails have the same name as
the images, but start with 'tn_'.
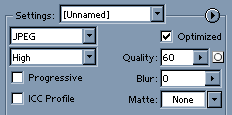
Flash cannot handle progressive encoded jpgs. 'Progressive' means while loading the .jpg from an HTML site, it will
first show in low res, and gradually become highres as more data comes in.
Adobe Photoshop has a tick-box in the 'save for web...' menu to enable/disable progressive encoding.
The XML file
a. make an XML file called 'images.xml' in the same directory your .fla will be.
b. set up the xml file like this:
01 <images directory="images">
02 <imageNode jpegURL="img_0.jpg" thumbURL="tn_img_0.jpg" title="Image 0">
03 Comments on Image 0
04 </imageNode>
05 <imageNode jpegURL="img_1.jpg" thumbURL="tn_img_1.jpg" title="Image 1">
06 Comments on Image 1
07 </imageNode>
..
..
.. <imageNode jpegURL="img_n.jpg" thumbURL="tn_img_n.jpg" title="Image n">
.. Comments on Image n
.. </imageNode>
.. </images>
The attribute 'directory' in points to the directory where the images are, in this case 'images'. This is a case sensitive variable!
The 'imageNode's contain the info per image:
- the attribute 'jpegURL' contains the image name
- the attribute 'thumbURL' contains the thumbnail name
- the attribute 'title' conatains an optional title
- the nodeValue contains optional comments per image
The filenames are case sensitive: be sure they are EXACTLY like the names of the images in the 'images' directory.
If a file is not found, the gallery will provide a warning in the output box, but will continue filling the gallery. You will just see the empty background for the thumbnail when a thumbnail file is not found. Same goes for a large image.
Setting up the .fla
a. open a new file in Flash MX.
b. set the dimensions of the stage to 616 x 300, and the framerate to 31.
- 616 because the thumbnail pane scrollbar is 16 pixels wide: this way we end up with 2 squares.
c. save the file as 'gallery.fla' in the 'gallery' directory.
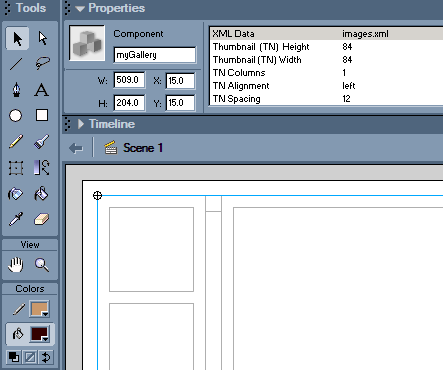
d. press 'F11' to open the components pane. Find the gallery and drag it on the stage.
e. you now have 2 options:
1. set up the component by providing the info as component properties and resize the live-preview to suit your needs.
2. set up the component with Actionscript.
This manual will guide you through the Actionscript setup.
f. select the component on the stage, and delete it. It should now only appear in the library.
g. open the actionscript panel, click the options button and set it to 'Expert Mode'.
The globalStyleFormat setup
a. use this function (or any of your own) to set the globalStyleFormats:
01 function setGlobalStyleFormat(){
02 globalStyleFormat.face = 0xEFEFEF;
03 // globalStyleFormat.background = 0xCCCCCC;
04 globalStyleFormat.arrow = 0xAAAAAA;
05 globalStyleFormat.darkshadow = 0xAAAAAA;
06 globalStyleFormat.shadow = 0xEFEFEF;
07 globalStyleFormat.highlight = 0xEFEFEF;
08 globalStyleFormat.highlight3D = 0xAAAAAA;
09 globalStyleFormat.scrollTrack = 0xFFFFFF;
10 globalStyleFormat.selection = 0xAFAFAF;
11 globalStyleFormat.textSelected = 0x000000;
12 globalStyleFormat.textColor = 0x666666;
13 globalStyleFormat.textFont = "ArialEmbedded";
14 globalStyleFormat.embedFonts = true;
15 globalStyleFormat.textSize = 13;
16 globalStyleFormat.applyChanges();
17 }
18 setGlobalStyleFormat();
- the background color of the thumbnail- and the imageholder is set with the 'face' styleformat.
- the active thumbnail holder color is set with the 'selection' styleformat.
Any fonts used need to be embedded. You do this by:
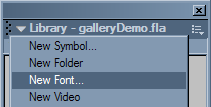
- click the options menu of the library (for the library press 'CTRL + L')
- choose 'New Font..'
- in this case choose 'Arial' for the font from the list
- name it wise, e.g. "ArialEmbedded"
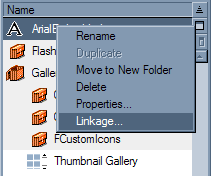
- rightclick your newly created font
- choose 'Linkage'
- set 'Linkage' to "ArialEmbedded" as well
If you forget to embed your font you will only see the first thumbnail in the scrollpane and
no masking of thumbnails titles outside of the scrollpane (appearing in an aliased 'Times New Roman')
The Actionscript
a. below the 'setGlobalStyleFormat();' function put this code:
01 g1 = this.attachMovie("FGallerySymbol","myGallery",1);
02 g1.setXMLFile('images.xml');
03 g1.setTnStageSide('left');
04 g1.setColumns(3);
05 g1.setTnSize(84, 84);
06 g1.setSize(616,300);
07 stop();
this is the most basic code to get the gallery up and running, step-by-step it does this:
- 01, attach the movie from the library and assign the it to the variable 'g1'
- 02, setXMLFile: set the source XMLFile for the gallery, in this case 'images.xml'
- 03, setTnStageSide: set the side the thumbnail pane appears on, options are 'left' or 'right'
- 04, setColumns: set the number of columns, in this case 3.
- 05, setTnSize: sets the size of the thumbnails, do not have to be square.
- 06, setSize: sets the size of the total gallery. In this case the thumbnailpane will be 300px wide + the scrollbar, the images
will therefore be shown in an 300px square as well.
b. publish your movie.
If you would like any further information on the working of any function for the gallery, open the reference panel with
'SHIFT+F1' and find the entry called 'fGallery'. This section also explains how the sizing of the gallery is handled internally.
The optional settings
a. Optional: other functions you might find handy:
01 g1.setTnBorder(12);
02 g1.setTnSpacing(12);
03 g1.setTnTitleStyle('title');
04 g1.setTnLabelHeight(17);
05 g1.setActiveTn(1);
06 var activeTn = g1.getActiveTn();
These functions and more are explained in the Reference Panel under 'fGallery'.
b. Optional: to get to the comments in the imageNodes you can make a textfield and assign the variable 'g1.imageText;' The variable will change everytime you click another thumbnail.
c. Optional: you can assign a clickHandler to the large pictures for enabling pop-ups or download options:
01 function clickMe(id) {
02 //get imagenode for this thumbnail
03 //'id' counts from 1, XML counts from 0: hence the '-1'
04 var imageNode = myGallery.getXMLNode().firstChild.childNodes[id - 1];
05 trace(imageNode);
06 }
07 myGallery.setClickHandler('clickMe', _root);
this is only example code and will do nothing more than display the xml node assigned the clicked picture in the output box.
These functions and more are also explained in the Reference Panel under 'fGallery'. Also you will find some more coding examples in the demoGallery.fla and on the site in the 'extraDownloads' section.


